General

How to open the main menu

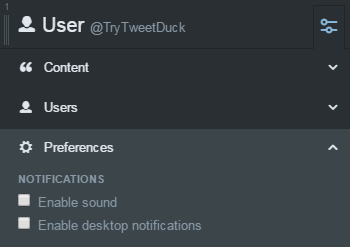
The main menu gives you access to the following items:

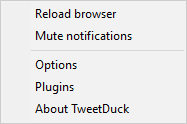
There are two ways to open the main menu:

  • Click Settings in the left panel and select TweetDuck, or...
  • Right-click anywhere and you will either see the listed options, or a TweetDuck entry that contains these options
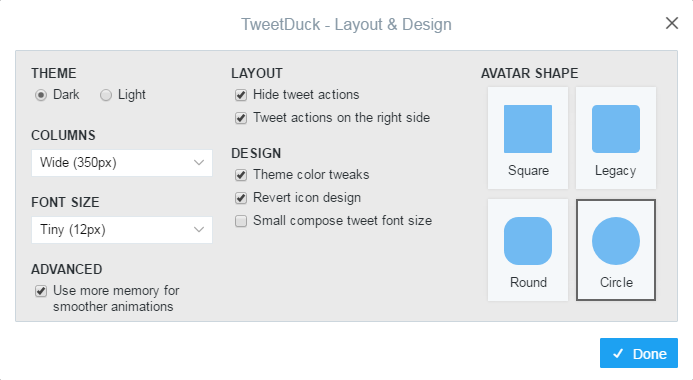
How to customize the theme and layout
  1. Click Settings in the left panel
  2. Continue to Edit layout & design
  3. Now you can customize many aspects of the website; note that unlike the default TweetDeck settings, the column width and font size can be configured here in much greater detail

This is done using an official plugin called Edit layout & design, which is enabled by default. If the plugin is disabled, you can still access the default TweetDeck settings:

  1. Click Settings on the bottom left
  2. Continue to Settings (again)
  3. Here you can customize the theme, column width, and font size
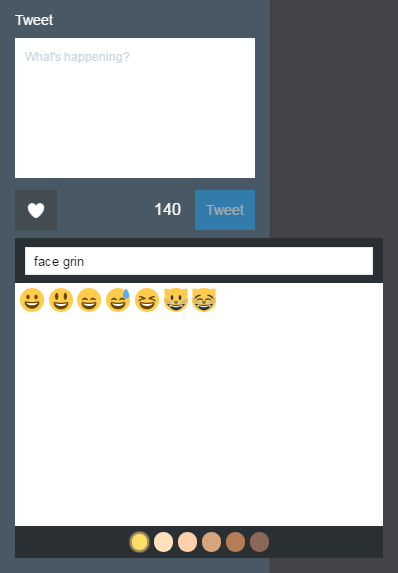
How to add emoji to tweets

When writing a new tweet, click the heart icon to open an emoji picker. If you're writing a reply, click the Popout icon to bring the reply into the New Tweet panel.

Then you can immediately type into the Search field, which accepts keywords separated by space. Pressing Enter in the search field (when not empty) will insert the first result into your tweet. Pressing Escape closes the emoji picker.

You can also use your mouse to change the skin tone, scroll through the emoji, and click on the emoji to insert them.

Typing :emoji_name: in the New Tweet panel will automatically search for an emoji using those keywords. If a single emoji is found, it will be inserted into the tweet (press Backspace or Escape to revert it). If multiple emojis are found, it will open the emoji picker where you can refine the search, or press Escape to go back.

Emoji are provided by an official plugin called Emoji keyboard, which is enabled by default. The heart icon will not show if the plugin is disabled.

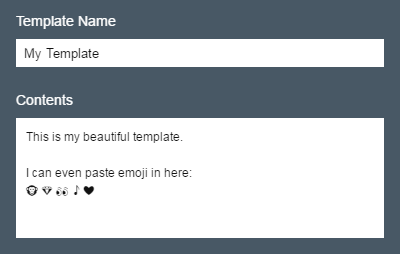
How to use tweet templates

To create a simple template to use when writing a new tweet or reply:

  1. Click Manage templates in the New Tweet panel; if you're writing a reply, click the Popout icon first to bring the reply into the large panel
  2. Click New template on the bottom right
  3. Fill in the template name and contents
  4. Click Confirm to create the template

After you create a template, it will be added to the list. There are two icons next to each entry:

  • Click the pencil icon to edit the template
  • Click the cross icon to delete the template

To use the template, click the template name to replace your current tweet text with the template, or click while holding Shift to append the template to your tweet instead. You can use the Shift+click functionality to quickly chain multiple templates.

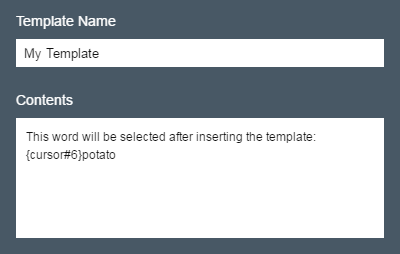
When writing a template, you can use special tokens listed in the Advanced section. Here is an example of one of the tokens:

How to upload images from clipboard

When writing a tweet/reply, press Ctrl+V to upload an image from clipboard. You can use this to quickly paste a selection from an image editor such as Paint, or after copying an image in your browser.

Make sure you're in the tweet input field before you press Ctrl+V, otherwise the keyboard shortcut won't trigger.

Note that this will only work when your clipboard contains the image itself; it will not work if you copy a file or URL.

Columns

How to copy links to tweets

When you right-click anywhere inside a tweet, you will be given these options:

  • Open tweet in browser
  • Copy tweet address
  • Screenshot tweet to clipboard

If the tweet contains a quote, you will also be able to directly open the quote or copy its address.

Note that these options will not appear when you right-click a private message.

How to download images and videos

When you right-click an image or a video thumbnail with a purple play button, you will be given these options:

  • Open image/video in browser
  • Copy image/video address
  • Save image/video as...

TweetDuck will attempt to fetch the highest quality image when you click any of these options. You can disable that by going to the main menu, selecting Options, and then unchecking Best Image Quality.

Whenever possible, the username and quality are included in the filename by default for convenience. After you select a folder and click Save, the image/video will be downloaded in the background. There is no notification for when the download finishes, but you will be notified if it fails.

How to take screenshots of individual tweets

When you right-click anywhere inside a tweet, you will be given these options:

  • Open tweet in browser
  • Copy tweet address
  • Screenshot tweet to clipboard

Taking a screenshot may take several seconds, especially if it contains large images or previews. After taking a screenshot, you can paste it into an image editor such as Paint.

Note that these options will not appear when you right-click a private message.

How to clear and restore column contents

TweetDeck lets you clear a column, which can help keep things organized by hiding tweets you have already read. To clear a column, click the slider icon on top of the column, and then click the Clear button.

If you need to revert this decision and restore a column, normally you would need to delete and re-create it, but in TweetDuck you can simply hold Shift which turns the Clear button into a Restore button.

If you clear columns frequently, you can enable an official plugin that lets you clear columns much quicker:

  1. Open the main menu, and select Plugins to open the list of available plugins
  2. Find an entry that says Clear columns, it will be somewhere near the bottom as the plugin is disabled by default
  3. Click Enable on the right side to enable the plugin and reload the browser

Now you can clear...

  • ...a single column by clicking the droplet icon on top of each column
  • ...a single column by holding the 1-9 number key and pressing Delete
  • ...all columns by clicking Clear columns in the left panel
  • ...all columns by pressing Alt+Delete

As mentioned before, hold Shift with any of these to restore the columns instead. Note that some keyboard layouts require using the Shift key when pressing number keys; if that is the case for you, please use the numpad or mouse instead.

Notifications

How to enable desktop or sound notifications

New columns have disabled notifications by default. To enable them, click the slider icon on top of the column, and expand the Preferences section.

Now you can toggle either, or both of the notification options:

How to move or resize desktop notifications

Open the main menu, select Options, and then click the Notifications tab. Here, you can customize many aspects of desktop notifications.

Scroll down to the Location section where you can customize where the notification shows up. You can either pick one of the 4 corners of your screen and the distance from the corner, or select Custom and then you'll be able to freely move the example notification window.

Scroll down to the Size section to customize the size of the notification window. By default, TweetDuck sets the size based on your font size setting, the zoom level you can customize in the General tab, and your system DPI. If you pick Custom, you will be able to freely resize the example notification window.

Note that moving and resizing the notification only works while you're inside the Options dialog, that is to prevent accidental clicks messing up your settings.

How to customize sound notifications

Open the main menu, select Options, and then click the Sounds tab. Here, you can pick a sound file that will be used instead of the default TweetDeck sound notification.

Keep in mind that you're only linking to the sound file, so make sure not to delete the file afterwards, otherwise TweetDuck won't find it anymore.

If you're unable to select MP3 files or other common audio file types, please ensure that you have Windows Media Player installed on your system, otherwise you will only be able to select basic WAV files.

How to temporarily mute all notifications

There are two ways you can mute/unmute notifications:

  • Open the main menu and click Mute notifications
  • If you've enabled the tray icon, right-click it and then click Mute notifications

The option persists across restarts – if you mute notifications and then restart TweetDuck, don't forget to unmute the notifications again.

Unmuting notifications will display all missed desktop notifications (unless TweetDuck was restarted in the meantime).

Options

How to configure TweetDuck

Open the main menu and select Options. Here you can configure various parts of TweetDuck; the dialog is split into several tabs:

  • General tab for user interface, zoom, and update options
  • System Tray tab to enable and configure the tray icon
  • Notifications tab to configure desktop notifications
  • Sounds tab to set a custom sound notification
  • Advanced tab for highly technical options

You can move your cursor over most options to display a tooltip with a detailed explanation of what that option does.

How to view and manage plugins

TweetDuck has several offical plugins that extend the website and notifications with new functionality.

Open the main menu and select Plugins to open the plugin list. Here you can see what each plugin does, and enable/disable them individually.

If you want to install a custom plugin, click Open Plugin Folder. A plugin is a folder that contains a .meta file and several others, make sure you copy and paste the folder itself into the opened plugin folder. To verify that you installed it correctly, click Reload All (which also reloads the website) and the plugin should appear.

Please, be careful when installing new plugins, and ensure that you get them from trustworthy sources. If you're unsure about a plugin, feel free to create an issue and upload the plugin there (GitHub account required).

How to backup your profile or move it to another computer
  1. Open the main menu, select Options, and click Manage Options on the bottom left
  2. Select Export profile and proceed with Next
  3. Select items you want to save in your profile (note that Plugin Data includes data from official plugins, such as those that let you customize the website or create tweet templates)
  4. Click Export Profile

You can save your profile into a cloud storage (Dropbox, Google Drive, etc.) or an external drive, for example. When you want to restore it, follow the same steps but select Import profile and then select the file instead.

When importing a profile, you will be again able to pick which items you want to restore. You can for example export a full profile including your login session, but then only import program options and plugin data if you want to login to a different account.

How to restore default options
  1. Open the main menu, select Options, and click Manage Options on the bottom left
  2. Select Restore defaults and proceed with Next
  3. Select items you want reset (note that Plugin Data includes data from official plugins, such as those that let you customize the website or create tweet templates)
  4. Click Restore Defaults

Efficiency

How to use keyboard shortcuts
  1. Click Settings in the left panel
  2. Continue to Keyboard shortcuts
  3. Here you can see most available keyboard shortcuts you can use in the browser window

You can also often hold Ctrl or Shift to trigger alternative actions:

  • When selecting accounts, hold Shift to select multiple accounts (can be configured in the Options)
  • When clearing columns, hold Shift to restore the column instead
  • When clicking video thumbnails, hold Ctrl to open them in your browser

Finally, if you click into a desktop notification window, you can use these keyboard shortcuts:

  • Enter to skip the current notification
  • Escape to close the window (skips all notifications in the queue)
  • Space to pause/unpause the timer
How to use the forward / back mouse buttons

If you have a mouse that supports the forward and back buttons, you can use them in both the browser and a desktop notification. All you need to do is move the cursor over the window (even if it's not focused), and press one of the buttons.

In the browser:

  • Press forward over a tweet to open it in detail view (unlike clicking, this will not trigger links or media thumbnails)
  • Press back anywhere to close modal dialogs or the New Tweet panel, or over a column to return back from detail view (if there are no dialogs or panels open, pressing the button outside a column will trigger it for all columns at once)

In the desktop notification:

  • Press forward to skip the current notification
  • Press back to close the window (skips all notifications in the queue)
How to keep the New Tweet panel open

Open the New Tweet panel, and click the pin icon on top. When the pin points to the left, the panel will stay open after tweeting or restarting TweetDuck.

How to instantly popout replies or quote tweets

Middle-click the reply icon to instantly open your reply in the New Tweet panel, or middle-click the retweet icon to quote a tweet instead of retweeting it.

Middle-clicking is usually done by pressing your mouse wheel as if it was a button. Some mice or other devices, such as laptop touchpads, may have a dedicated button or button combination instead.

How to change which account will be pre-selected for replies

By default, TweetDeck pre-selects the account mentioned in the column header. The ability to change this is provided by an official plugin which is disabled by default, as it's a bit more difficult to setup, but it can be very powerful. To enable the plugin:

  1. Open the main menu and select Plugins
  2. Find an entry that says Custom reply account, it will be somewhere near the bottom as the plugin is disabled by default
  3. Click Enable on the right side to enable the plugin

After you enable the plugin, it will use your preferred account for all replies by default. If that's your intention, you can simply enable the plugin and leave it, otherwise continue reading:

  1. Click Configure next to the plugin to open a folder with the configuration file
  2. Open configuration.js in a text editor that can edit and save JavaScript or any pure text files, therefore office suits or WordPad are not suitable; if you don't have any specific editor, use Notepad.
  3. The configuration file includes very detailed instructions – you can use one of the presets, a specific account for all replies, or use JavaScript to fully customize the reply behavior

After editing the configuration, return back to Plugins and click Reload All on the bottom left. Now you can close Plugins and test if replies work the way you want.

Note that this will not affect the Messages column, that one will always pre-select the account which received the private message.

Advanced

How to open Chrome Dev Tools
  1. Open the main menu, select Options, and click the Advanced tab
  2. Click Open Program Folder
  3. Download devtools_resources.pak and place it into the opened folder
  4. Click Restart the Program
  5. Now, open the main menu again and you should see Open dev tools; you can also right-click inside a notification and see the same option (make sure to pause the notification first by clicking Freeze in the context menu)
How to customize styles using CSS
  1. Open the main menu, select Options, and click the Advanced tab
  2. Click Edit CSS

Now you can write custom CSS into the Browser and Notification sections.

Note that the Browser section will immediately take effect as you type. You can also still access the browser and Dev Tools, as the dialog does not block the browser window.

Basic knowledge of HTML and CSS is recommended. Mozilla Development Network has a huge library of resources on both HTML and CSS.

How to develop plugins

Before creating a plugin, you should have at least basic knowledge of web development (namely HTML, CSS, JavaScript), and several JS libraries TweetDeck uses, such as jQuery 2, Mustache, klass, and Flight.

Working with the TweetDeck source code involves a lot of reverse-engineering. You can visit DeckHack which is working to document its source code, and view TweetDuck sources which includes all scripts and official plugins.

Once you're ready to start creating your own plugins, visit the official plugin development documentation which will explain the structure of a plugin, and show you all TweetDuck-specific functionality you cannot normally use in browsers.